 By Richard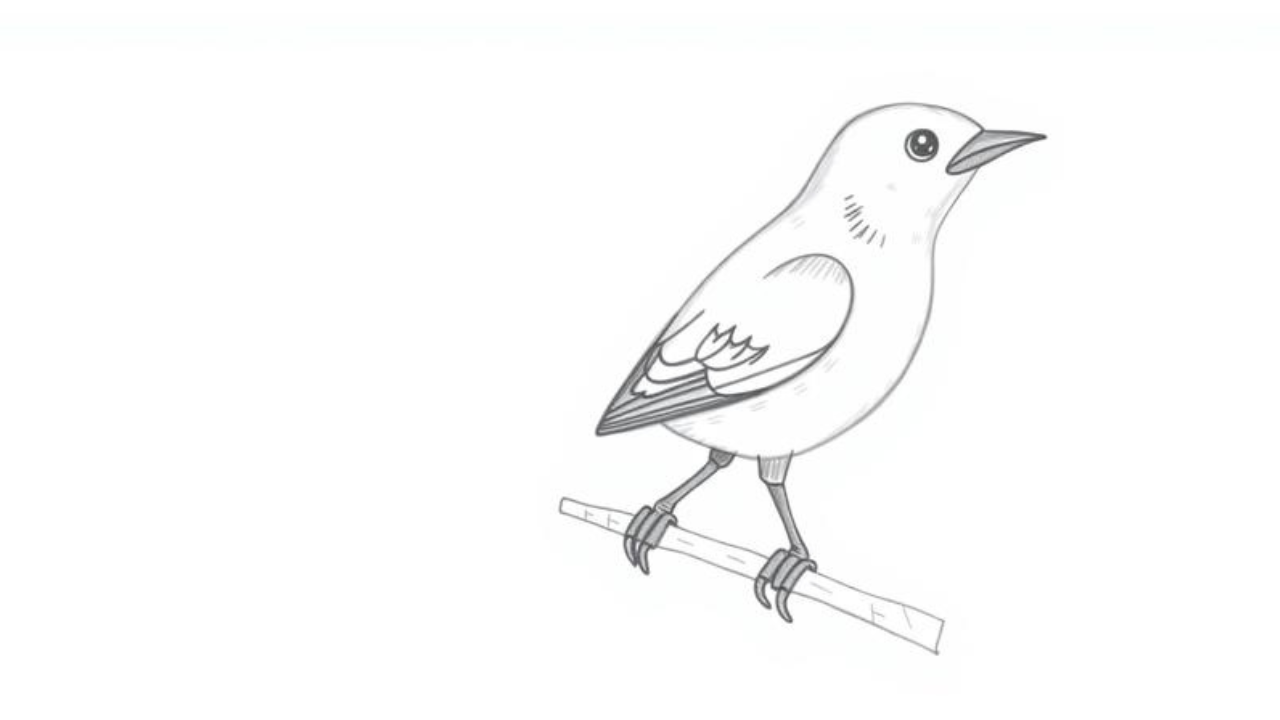
Have you ever paused to admire a mockingbird’s graceful pose and thought, “I wish I could sketch that”? You’re not alone. Mastering a mockingbird drawing easy enough for beginners is simpler than you think. In this guide, you’ll learn a step-by-step method to draw a mockingbird from basic shapes, add details like wing feathers and a long tail, and shade your sketch to life. By the end, you’ll have a finished drawing and the confidence to sketch any songbird. Grab a pencil and let’s get started.
Table of Contents
-
What Is a Mockingbird Drawing Easy?
-
Why Does Learning to Draw a Mockingbird Matter?
-
Mockingbird Drawing Easy: Key Facts & Anatomy
-
How to Draw a Mockingbird Easy Step-by-Step
-
Common Mistakes to Avoid When Drawing Mockingbirds
-
Expert Tips for a Realistic Mockingbird Drawing
-
Frequently Asked Questions
-
Conclusion
What Is a Mockingbird Drawing Easy?
A mockingbird drawing easy is a simplified sketch of the Northern Mockingbird that anyone can complete, even if you’ve never drawn a bird before. Instead of trying to capture every feather perfectly, you break the bird down into a handful of familiar shapes—circles, ovals, and triangles—and then refine those shapes into a recognizable, elegant songbird.
Think of it like building with blocks. You start with an oval for the body, a circle for the head, a long triangle for the tail, and soft lines for the legs. Once those basic building blocks connect naturally, you gently carve away the excess lines and add the bird’s signature markings. That’s it.
For example, if you’ve ever doodled a simple cartoon cat using circles, you already understand the core idea. A mockingbird drawing follows the same logic. You’re not aiming for a museum-ready illustration. You’re after a clean, recognizable sketch that makes you smile and builds your drawing muscle. And because mockingbirds hold distinct poses—upright posture, long tail angled down, alert eye—their silhouette is one of the easiest to learn. Once you know the shape recipe, you can sketch one in under ten minutes.
Why Does Learning to Draw a Mockingbird Matter?
Drawing a mockingbird isn’t just about adding another bird to your sketchbook. It trains your hand, eye, and patience in ways that spill over into every other subject you’ll ever draw.
-
You learn to see shapes, not objects. Beginners often freeze because they see a complex bird. Break it into simple shapes, and suddenly any subject feels manageable.
-
It builds line confidence fast. A mockingbird’s long tail and clean breast demand smooth, intentional strokes. Practice those strokes and your overall pencil control improves.
-
You sharpen observation skills. Real drawing happens with your eyes. Studying a mockingbird’s posture, the white wing bars, and the dark eye stripe teaches you to notice detail you’d normally overlook.
-
You create a foundation for all songbirds. Once you nail the mockingbird proportions, finches, robins, and warblers become variations on the same blueprint.
-
It’s a proven stress-reliever. Focusing on one simple drawing task quiets a busy mind. According to a 2021 study in Art Therapy: Journal of the American Art Therapy Association, just 20 minutes of structured drawing significantly reduced cortisol levels in beginner artists.
Even if you only draw one mockingbird this week, the skills you build will make your next sketch better. That’s why a mockingbird drawing easy approach matters—it gives you a quick, confidence-boosting win.
Mockingbird Drawing Easy: Key Facts & Anatomy
You don’t need to be an ornithologist, but knowing a few key mockingbird traits transforms a generic bird sketch into something recognizable. Use these facts as a cheat sheet before you start drawing.
Northern Mockingbird Silhouette
The Northern Mockingbird has a slim, medium-sized body (about 9–11 inches long) with a long tail that makes up nearly half its total length. When perched, it often holds its tail slightly downward or flicks it up in a characteristic motion. The head is rounded with a thin, slightly curved beak, and the legs look delicate but sturdy.
Proportions and Size
Proportion mistakes are the fastest way to lose a mockingbird’s identity. Keep this table nearby as you sketch.
| Body Part | Approximate Size Relationship | Quick Tip |
|---|---|---|
| Head | 1/4 of body length | Draw a circle slightly smaller than your body oval. |
| Body | Oval, about 1.5 times head length | Use a slanted oval to suggest natural posture. |
| Tail | Equal to body length or slightly longer | Draw a long, slim triangle extending from the lower body. |
| Beak | 1/3 of head length | Thin, slightly down-curved triangle. |
| Legs | About 1/2 body length | Thin lines with tiny joints; toes grip perch. |
Feather Groups Simplified
You don’t need to draw every feather. Focus on three main groups: the smooth breast (light gray to white, minimal texture), the folded wing (long feathers with a white patch that shows as a white bar), and the tail feathers (dark with white outer edges visible in flight or flicking). The dark eye line running from the beak through the eye is a signature detail. Nail that stripe, and your mockingbird drawing immediately reads as this species.
How to Draw a Mockingbird Easy Step-by-Step
Work through these seven steps at your own pace. Use light pencil lines first; you’ll darken only the lines you want to keep. [ bird drawing ideas]
1. Draw the posture line and two main shapes.
Lightly sketch a slightly slanted line to represent the branch or perch. Then draw a tilted oval for the body and a circle for the head that overlaps the body slightly at the top. This two-shape start makes a mockingbird drawing easy from the very beginning.
2. Add the tail and beak.
From the lower back of the body oval, draw a long, narrow triangle that extends downward at a gentle angle. This is the tail. On the front of the head circle, add a small, thin triangle pointing outward and slightly down—the beak.
3. Sketch the wing and belly curve.
Draw a curved line from the middle of the body oval down toward the tail base to separate the wing from the belly. Then add a soft curve along the lower oval to define the breast. Your bird now has a clear body plan.
4. Place the eye, eye stripe, and legs.
Inside the head circle, draw a small circle for the eye, positioned slightly forward of center. Draw a line that starts at the beak base and runs through the eye toward the back of the head—this is the dark eye stripe. Add two thin, angled lines below the body for legs, with tiny three-toed shapes gripping the perch.
5. Refine wing and tail details.
Now sketch the main wing feathers using long, slightly overlapping curves. Add a small white wing bar by leaving a narrow unshaded strip between feather rows. On the tail, draw a few straight lines inside the triangle to suggest individual feathers. Keep the lines light.
6. Outline the smooth breast and clean up.
Go over your best lines with a slightly darker pencil. Smooth out the breast contour, define the head shape clearly, and erase the original construction circles you no longer need. Don’t press hard—confident, fluid lines look more lifelike than scratchy ones.
7. Shade for depth and realism.
Add light shading on the upper side of the body and wing to indicate gray tones. Leave the breast mostly white with very soft shading along the lower edge. Darken the eye stripe, the eye itself (leaving a tiny white catchlight), and the beak. Shade the top of the tail and the legs. Your mockingbird drawing easy is now complete.
Common Mistakes to Avoid When Drawing Mockingbirds
Small errors can make your bird look stiff or unrecognizable. Here are the biggest traps beginners fall into, and how you can sidestep them.
Mistake 1: Making the tail too short.
A stubby tail destroys the mockingbird silhouette. Always check that your tail length equals the body length from beak to tail base. When in doubt, draw it longer—you can trim later.
Mistake 2: Placing the eye too far forward or too high.
The eye sits in the middle of the head circle horizontally and slightly forward of center vertically. A high-placed eye makes the bird look like a fish. Use the dark eye stripe as your guide; the eye must sit inside that stripe.
Mistake 3: Skipping the white wing bar.
Many beginners draw uniform wing shading and lose the mockingbird’s most famous field mark. Always leave a distinct, unshaded strip across the folded wing. It’s what makes your drawing a mockingbird, not a generic bird.
Mistake 4: Drawing stiff, stick-like legs without joints.
A mockingbird’s legs bend slightly backward at a visible ankle joint. Draw a tiny angle where the “knee” would be, then taper the leg slightly. Straight, unbent legs look robotic.
Mistake 5: Pressing too hard with the pencil too soon.
Beginners often commit to dark lines before nailing the proportions. Use a light hand for your first three steps. You can always darken winning lines later; dark lines are hard to erase without smudging.
Expert Tips for a Realistic Mockingbird Drawing
These five tips come straight from sketch artists who draw birds daily. Apply even one and your next mockingbird drawing will level up.
-
Start every session with 30 seconds of gesture sketches. Draw three tiny, loose mockingbirds in quick succession to warm up your observation of posture.
-
Use a reference photo you love. Pick a clear side-view image of a mockingbird on a branch. [EXTERNAL: audubon.org] offers excellent free bird photography.
-
Draw the eye stripe first, not last. The dark band that runs through the eye anchors the whole face. Place it early and build head proportions around it.
-
Hold your pencil farther back for looser lines. A relaxed grip creates the soft, feathery edges that make your bird feel alive, not frozen.
-
Trace your own drawing once. Lay tracing paper over your final sketch and trace it cleanly. That final traced version often looks sharper and teaches you which lines truly matter.
Frequently Asked Questions
What makes a mockingbird drawing easy for a complete beginner?
A mockingbird drawing easy approach works because it breaks the bird into just four or five simple shapes—oval body, circle head, triangle tail, thin beak—before adding details. Beginners avoid the intimidation of complex feathers and focus on proportions first. Once the shape framework is right, even soft, minimal shading creates a recognizable mockingbird.
How long should a simple mockingbird sketch take?
Your first drawing might take 15 to 20 minutes if you follow step-by-step instructions carefully. After a few practice runs, you’ll finish a clean, simple mockingbird sketch in under 10 minutes. Speed isn’t the goal, but the simple shape method naturally gets faster as your hand and eye coordinate better.
Can I draw a mockingbird without knowing how to shade?
Absolutely. A pure line drawing with the correct silhouette, eye stripe, and wing bar is instantly recognizable. You can add shading later when you feel ready. Many charming field sketches rely entirely on clean contour lines and a few feather suggestion marks, no shading required.
Conclusion
You now have everything you need to create a mockingbird drawing easy and full of character. Remember to start with simple shapes, respect the long tail and wing bar, and keep your early lines light. Those three habits alone will transform your bird sketches overnight. Pick up a pencil right now and draw the posture line and two main shapes. In ten minutes, you’ll have a mockingbird staring back at you from the page. Which bird will you draw next after you’ve mastered this one? Let me know in the comments.