
Introduction
You’re flipping through a field guide or scrolling through nature illustrations, and you stop at a picture of a muskrat. There’s something about that sturdy, semi-aquatic rodent—the rounded back, the distinctive scaly tail—that makes you think, “I’d love to draw that.” So you grab your pencil, start sketching, and… something looks off. The proportions feel wrong, the tail looks like a rat’s, and the whole thing just doesn’t capture that unique muskrat character.
Drawing a muskrat can be surprisingly tricky. They’re not as commonly illustrated as cats or dogs, so reference images can be hard to find. Their anatomy is a blend of familiar features—part beaver, part rat, part something entirely their own—that can confuse even experienced sketchers. And if you’ve never studied their distinctive proportions, your drawing can easily end up looking like a generic brown blob rather than a recognizable muskrat.
This article delivers everything you need to know about how to draw a muskrat with confidence. From understanding their unique anatomy to following a clear, step-by-step drawing process, you’ll learn practical techniques that work for beginners and intermediate artists alike. Whether you’re sketching for a school project, creating nature journal illustrations, or just exploring a new subject, these guidelines will help you produce a muskrat drawing you can be proud of.
What Is a Muskrat? Understanding Your Subject
Before you can draw a muskrat well, you need to understand what makes a muskrat a muskrat. This semi-aquatic rodent (Ondatra zibethicus) is native to North America but has also been introduced to parts of Asia, South America, and Europe. They’re most commonly found in wetlands with varying temperatures, making their homes in marshes, ponds, and riverbanks.
Key Physical Characteristics
Muskrats have several distinctive features that set them apart from other rodents:
-
Size and build: Muskrats are normally between 40 to 70 cm (about 16 to 28 inches) in total length, and remarkably, half of that length comes from the tail alone! They typically weigh around 0.6 to 2 kg (1.3 to 4.4 pounds). Their bodies are sturdy and robust—”pear-shaped” is how some describe it—with a rounded back and a somewhat heavy appearance.
-
Fur and coloring: These rodents are dark brown to black in color, except for the belly which is slightly lighter. Their fur is short and incredibly thick because it has two layers, helping to keep them warm and comfortable while swimming in cold waters. This double-layered fur is a key feature to capture in your drawing—it gives the muskrat that plush, dense look.
-
The tail: This is the muskrat’s most distinctive feature. The tail is long, tube-shaped, and hairless, covered in scales rather than fur. It’s also slightly flattened vertically to provide a larger surface area for swimming. This scaly, flattened tail is unique—muskrats are the only animals that have this particular tail shape.
-
Head and face: Muskrats have a short, rounded snout with small eyes and small ears. Their vibrissae (whiskers) are long, thick, and quite impressive. The head is typical for rodents—something between a rat and a beaver.
-
Feet: Their hind feet have long toes connected by a swimming membrane (partial webbing). The front feet are small and short, with five toes.
Understanding these features is the foundation of a successful muskrat drawing. Now let’s put that knowledge into practice.
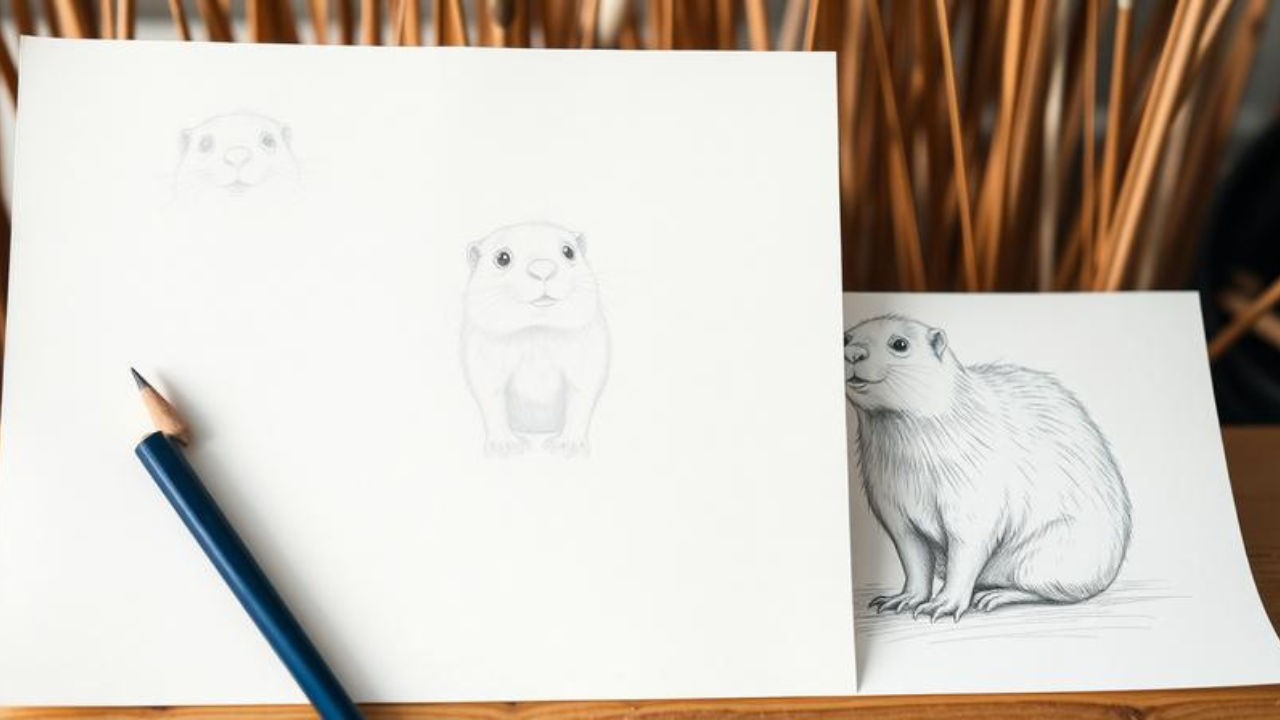
Step-by-Step Guide: How to Draw a Muskrat
Follow these seven steps to create a recognizable, well-proportioned muskrat drawing. Remember to use very light lines in the early steps—you’ll be refining and erasing as you go.
Step 1: Establish Basic Proportions with Simple Shapes
Start by sketching the fundamental shapes that will form the muskrat’s body. This is the most important step for getting proportions right.
For the head and torso: Draw two circles—one smaller for the head and one larger for the torso. The head circle should be positioned slightly above and in front of the torso circle. The torso should be noticeably larger and more elongated than the head, reflecting the muskrat’s sturdy, pear-shaped body.
For the limbs and tail: Using simple, light lines, sketch out the basic positions of the legs and the tail. The tail should extend straight back from the rear of the body—remember, it accounts for about half the animal’s total length!
Pro tip: If you’re drawing a muskrat in a swimming or semi-aquatic pose (which is very natural for this animal), consider angling the body horizontally with the tail trailing behind.
Step 2: Define the Head and Facial Features
With the basic shapes in place, it’s time to give the muskrat its characteristic face.
The muzzle: Sketch out the elongated muzzle of your muskrat. Unlike a rat’s pointed nose, the muskrat’s snout is short and rounded. Add a small circle at the very front for the nose.
The ears: Add small ear shapes near the top of the head. Muskrat ears are small and subtle—don’t make them too prominent.
The eye: Using short lines, sketch out the eye. Draw two small circles, one inside the other, for the eye. Remember that muskrat eyes are small, so keep them modest in size.
The mouth: Add a curved line for the mouth.
Step 3: Add Detail to the Face
Now bring the face to life with some finer details.
Whiskers (vibrissae): Muskrats have long, thick, impressive whiskers. Draw three or four slightly curved lines coming down from around the nose area. These add character and help distinguish the muskrat from other rodents.
Refine the eye: Add more detail to the eye if desired—a small highlight can make it feel alive.
Add the nose detail: Define the nose more clearly with a small dark shape at the tip of the muzzle.
Step 4: Outline the Body and Add Fur Texture
Now it’s time to build out the body from your initial shapes.
The body contour: Draw a slight curve behind the head for the body. Follow the rounded shape of your initial torso circle, but make it feel organic and natural. The muskrat’s back is notably rounded—this is a key characteristic to capture.
Fur texture: Using very short, quick lines, begin to suggest the fur. The muskrat’s fur is thick and has two layers, so your lines should convey density and softness rather than sleekness. Keep your strokes short and directional, following the contours of the body.
Important note: The tail is not covered with fur. Make sure you clearly distinguish between the furry body and the scaly, hairless tail.
Step 5: Sketch the Legs and Feet
Add the limbs that make the muskrat so well-adapted to its semi-aquatic lifestyle.
Front legs: These are small and short, proportionally similar to human arms. Draw a small front leg extending down from the front of the body, topped with small toes.
Hind legs: These are more powerful and have long toes connected by a swimming membrane. Draw the hind leg with a slightly thicker appearance, and indicate the webbing between the toes with subtle curved lines.
Toes and claws: Muskrats have five toes on the front feet. Add small claw details at the tips of the toes.
Step 6: Draw the Distinctive Tail
The tail is arguably the muskrat’s most defining feature—get this right, and your drawing will be instantly recognizable.
Shape: Draw a long tube shape that is rounded off at the end. The tail should be long—remember, it makes up about half the animal’s total length!
Texture: Unlike the furry body, the tail is covered in scales rather than hair, and it’s slightly flattened vertically. To convey this scaly texture, use small, overlapping curved lines or crosshatching along the length of the tail. Don’t make it smooth like a rat’s tail—give it that distinctive segmented look.
Position: The tail typically trails straight back from the body, especially when the muskrat is in or near water.
Step 7: Refine, Shade, and Finalize
Now bring everything together for a polished final drawing.
Erase guidelines: Remove all the initial construction lines you drew in the first steps.
Refine the lines: Go over your drawing with more confident, finished lines.
Add volume with shading: Using hatching (parallel lines) or cross-hatching, add shadows to give your muskrat three-dimensional volume. Imagine that light falls on the muskrat from above, and add darker shading to the underside of the body, the belly, and beneath the legs. This creates depth and makes the drawing feel more realistic.
Color (optional): If you’re adding color, remember that muskrats are dark brown to black, with a slightly lighter belly.
Common Mistakes to Avoid
Even with a solid step-by-step approach, certain pitfalls can trip up your muskrat drawing. Here are the most common mistakes and how to avoid them.
Mistake 1: Getting the Proportions Wrong
The most frequent error is making the body too small or the head too large relative to each other. Muskrats are sturdy, robust animals—not slender like rats.
Fix: Always start with basic shapes (circles for the head and torso) and compare their sizes before adding detail. The torso should be noticeably larger and more elongated than the head.
Mistake 2: Making the Tail Too Short or Too Smooth
A short, rat-like tail is the #1 giveaway that you haven’t drawn a muskrat. Remember: half the animal’s total length is tail! And the tail should look scaly, not smooth and hairless like a rat’s.
Fix: Exaggerate the tail length if anything—it’s better to make it too long than too short. Use small curved lines or crosshatching to suggest scales.
Mistake 3: Ignoring the Rounded Back
Muskrats have a characteristically rounded back. A flat or hunched back will make your drawing look like a different animal entirely.
Fix: Pay close attention to the curve of the spine when sketching the body outline. The back should have a smooth, convex curve.
Mistake 4: Making the Ears Too Large
Muskrats have small ears that sit close to the head. Large, prominent ears will make your drawing look more like a mouse or rat.
Fix: Keep ears small and subtle—they should be an understated feature, not a focal point.
Mistake 5: Rushing to Fur and Shading Too Early
Many beginners jump straight to adding fur texture or shading before the basic shapes and proportions are correct. This is a common pitfall in animal drawing.
Fix: Spend most of your time on the early steps. Make sure the proportions, pose, and basic anatomy are solid before you add any texture or shading. As one expert advises, “Without mapping out simple shapes like circles, ovals, and rectangles, your animal’s proportions can quickly go sideways.”
Mistake 6: Forgetting About the Webbed Feet
The partial webbing on the hind feet is an important identifying feature of muskrats. Leaving this out makes your drawing less accurate and less interesting.
Fix: When drawing the hind feet, add subtle curved lines between the toes to indicate the swimming membrane.
Frequently Asked Questions
Q: What’s the difference between a muskrat and a nutria?
Muskrats and nutria (also called coypu) are very similar in appearance—even zoologists sometimes struggle to tell them apart at a glance! Both are semi-aquatic rodents with long, hairless tails. However, nutria are generally larger, have more prominent orange teeth, and their tails are rounder in cross-section (rather than vertically flattened like the muskrat’s). For drawing purposes, the two are similar enough that many tutorials cover both.
Q: What colors should I use for a muskrat drawing?
Muskrats are typically dark brown to black in color, with a slightly lighter belly. Their fur has a dense, thick appearance. If you’re using colored pencils or paints, start with a dark brown base and add darker shading for depth. The belly can be a slightly warmer, lighter brown. The tail is grayish or dark and should not have any brown fur color—it’s scaly and hairless.
Q: How do I make the fur look thick and realistic?
Muskrats have a double layer of fur that’s very thick. To convey this in a drawing, use short, directional strokes rather than long, smooth lines. Layer your strokes in the direction the fur grows, and don’t be afraid to build up density. Avoid making the fur look sleek or shiny—muskrat fur is dense and matte-looking.
Q: Should I draw the muskrat on land or in water?
Either pose works, but muskrats are semi-aquatic animals, so a water-adjacent setting is very natural. Consider drawing your muskrat swimming (with just the head and rounded back visible above the waterline) or sitting on a bank with its tail trailing into the water. These poses highlight the muskrat’s unique adaptations and make for more interesting compositions.
Q: What drawing tools work best for this subject?
For a detailed muskrat drawing, a set of graphite pencils (ranging from H to 6B) gives you control over line weight and shading. A kneaded eraser is useful for lifting highlights in the fur. If you’re working in color, colored pencils or watercolor are excellent choices for building up the rich brown tones of the fur. Start with a hard pencil (like an H or 2H) for the initial light sketch, then switch to softer pencils (B or 2B) for shading and finishing lines.
Conclusion
Drawing a muskrat is a rewarding challenge that connects you to the natural world. By understanding the animal’s unique anatomy—the sturdy, pear-shaped body, the thick double-layered fur, the distinctive scaly tail, and the small ears and eyes—you can create a sketch that’s both accurate and full of character.
Remember the key steps: start with simple shapes to get the proportions right, gradually add detail to the face and body, and don’t rush to shading before the fundamentals are solid. Avoid common pitfalls like making the tail too short, the ears too large, or forgetting the webbed feet. With practice, you’ll develop an eye for the subtle features that make the muskrat such a fascinating subject.
So grab your pencil, find a comfortable spot, and give it a try. Whether you’re drawing for a nature journal, a school project, or just for the joy of it, every sketch brings you closer to capturing the spirit of this remarkable wetland dweller.
Ready to explore more wildlife drawing? Check out our guide on how to draw a beaver to compare these two semi-aquatic rodents side by side. And don’t forget to subscribe to our newsletter for weekly drawing tips and tutorials delivered straight to your inbox!