 By Richard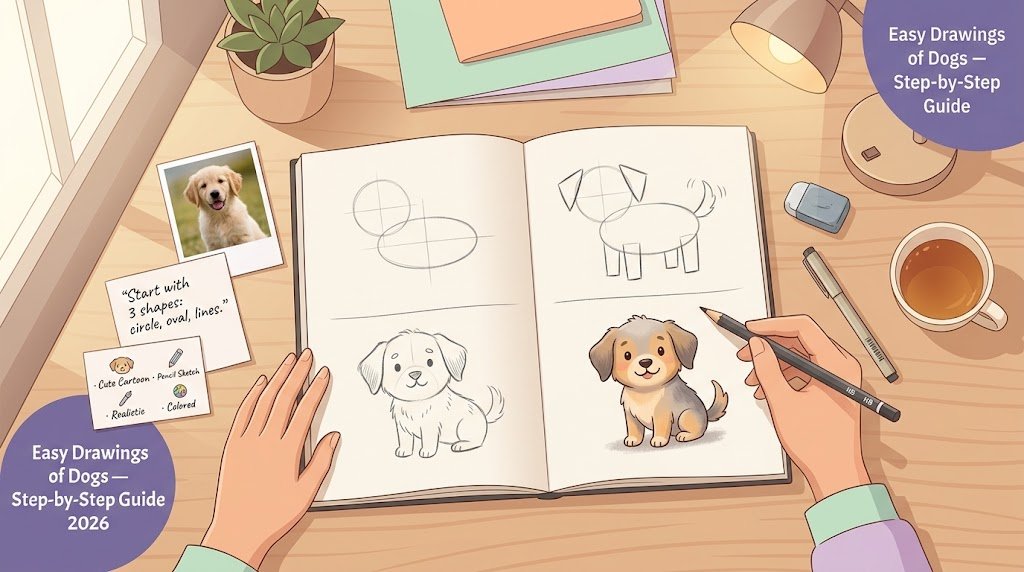
Easy Drawings of Dogs: Simple Guide to Drawing Your First Pup
Did you know that nearly every dog can be drawn with just three basic shapes? Many beginners give up on easy drawings of dogs because they expect a perfect portrait on the first try. The truth is that a charming, recognizable pup starts with simple circles and ovals.
This guide shows you how to build a dog from the ground up, choose the right pencils, and add color. You will learn what makes dog drawings work, why drawing dogs builds real skills, how different breeds and styles differ, a clear step-by-step method, common mistakes to skip, and expert tips for better results in 2026.
Table of Contents
- What Are Easy Drawings of Dogs?
- Why Do Drawings of Dogs Matter? Key Benefits
- Types of Dog Drawings and How They Work
- How to Draw a Dog Step by Step
- Common Mistakes and Myths About Dog Drawings
- Expert Tips for Best Dog Drawing Results
- Frequently Asked Questions
What Are Easy Drawings of Dogs?
Easy drawings of dogs are simplified sketches that capture a dog’s shape, posture, and personality without fine detail. They rely on basic geometric forms, such as circles for the head, ovals for the body, and lines for the legs and tail. Think of it like building a snowman. You start with a few round balls, stack them, and then add a face and arms. Dog drawings work the same way: each simple shape becomes a part of the animal.
For example, a cute cartoon puppy might use one large circle for the head, two floppy triangles for ears, and a small oval for the nose. Your viewer instantly recognizes a dog, even though you used only a few strokes.
Why Do Drawings of Dogs Matter? Key Benefits
Drawing dogs does more than give you a cute picture to share. It also trains your eye and builds confidence. Here is how practicing these drawings helps you:
- Sharpens observation: Studying a dog’s proportions teaches you to notice shapes, angles, and spacing in everything you draw.
- Builds confidence fast: Dogs are forgiving subjects, so you can see progress within a single session.
- Develops a personal style: Playing with cartoon, realistic, or minimalist approaches helps you discover what you enjoy most.
- Offers endless practice: Dogs come in countless breeds, poses, and sizes, so you will never run out of new subjects.
- Relaxes your mind: Focused sketching lowers stress and gives you a calm break from screens and daily pressure.
- Makes gifts personal: A hand-drawn portrait of someone’s pet is a meaningful present that money cannot easily buy.
According to the American Pet Products Association, roughly 66 percent of U.S. households own a pet, so you will find plenty of willing dog models around you.
Types of Dog Drawings and How They Work
Dog drawings come in several styles, and each style uses different tools and levels of detail. Choose the one that matches your goals.
Cute Cartoon Dogs
Cartoon dogs exaggerate features like big eyes, short legs, and round bodies. They work well for beginners because you do not need accurate proportions to make them charming. A simple outline and a few dots for eyes can complete the design.
Realistic Dog Drawings
Realistic drawings focus on accurate anatomy, fur texture, and lighting. They take more time and practice, and they often use graphite pencils in multiple grades to build shading. Start with a reference photo and study how light falls across the face and body.
Colored Dog Drawings
Colored drawings add warmth and personality through color pencils, markers, or watercolor. Use layers of light color first and build darker tones gradually. This approach keeps your fur looking soft rather than flat.
Here is a quick comparison to help you choose your starting style:
| Drawing Style | Difficulty | Best Tools | Time Needed |
|---|---|---|---|
| Cute Cartoon | Easy | Pencil, fine liner, markers | 10 to 20 minutes |
| Pencil Sketch | Moderate | Graphite pencils, eraser | 30 to 60 minutes |
| Realistic | Advanced | Graphite grades, blending stump | 2 to 10 hours |
| Colored | Moderate | Color pencils, watercolor | 30 to 90 minutes |
How to Draw a Dog Step by Step
Following a clear method makes your first dog drawing far less intimidating. Follow these steps for a simple pup.
- Draw the head circle. Sketch a light circle near the top of your page. This shape becomes the dog’s head, so keep your pencil strokes gentle and easy to erase.
- Add the body oval. Draw a horizontal oval below and slightly to the side of the head. Connect the two shapes with short, curved lines for the neck.
- Place the legs. Sketch four short rectangles beneath the body, two in front and two in back. Make the front legs slightly shorter for a playful look.
- Shape the ears and tail. Draw two floppy triangles on top of the head for ears. Add a curved line extending from the back for a wagging tail.
- Add the face details. Place two dots for eyes, a small triangle for the nose, and a curved line for the mouth. Keep the features close together for a friendly expression.
- Refine and add fur. Trace your final lines with a darker pencil and erase the guidelines. Add short, quick strokes along the chest and tail to suggest fluffy fur.
Common Mistakes and Myths About Dog Drawings
Myth: You need natural talent to draw dogs. Dog drawing is a skill that improves with practice, just like writing or cooking. Consistent sketching matters far more than any innate gift.
Mistake: Drawing every detail at once. Beginners often start with the nose and eyes, then struggle when the proportions look wrong. Begin with basic shapes so your overall structure stays balanced before you add details.
Mistake: Pressing too hard with the pencil. Heavy pressure makes erasing difficult and creates dark, messy lines. Use light strokes first, then darken only the lines you want to keep.
Myth: Realistic dogs require expensive supplies. A single HB pencil, a soft eraser, and plain paper are enough to start. Save your budget until you know which tools you enjoy using most.
Mistake: Copying photos without studying them. Tracing a photo can build hand control, but it does not teach structure. Study the dog’s proportions and sketch from observation for better long-term growth.
Expert Tips for Best Dog Drawing Results
- Use reference photos. Find clear images of your favorite breed to study real proportions and fur patterns.
- Draw with a light touch. Keep early guidelines faint so they erase cleanly later.
- Practice the same pose several times. Repeating one pose builds muscle memory and helps you spot improvements quickly.
- Add shadows under the paws. A simple shadow anchors your dog to the ground and makes it look grounded.
- Choose the right paper. Smooth sketch paper handles pencil well, while heavier paper works better for colored media.
Frequently Asked Questions
How do I draw a cute dog easily?
Start with simple shapes: a circle for the head, an oval for the body, and short rectangles for the legs. Add large eyes, a small nose, and floppy ears to create a cute expression. Keep your lines light so you can adjust them easily. Once the basic shape feels right, add fur with short, quick strokes. Practice this method a few times, and you will draw a charming puppy in under 15 minutes.
What pencils are best for drawing dogs?
A graphite pencil set with a range of grades works best for dog drawings. Use an HB pencil for general sketching, a 2B or 4B for darker shading, and a 2H for light guidelines. A soft kneaded eraser helps you lift highlights without tearing the paper. If you want color, start with a basic set of color pencils in browns, grays, and whites. These tools cover nearly every dog coat you will encounter.
How can I make my dog drawing look realistic?
Focus on accurate proportions first, then study how light hits the fur. Use a reference photo and compare the distances between the eyes, nose, and ears. Shade the darkest areas, such as under the chin and inside the ears, and leave the highlights bright. Build fur texture gradually with many small strokes rather than one heavy line. With steady practice, your realistic drawings will improve noticeably over just a few weeks.
Conclusion
Easy drawings of dogs become simple once you break them into basic shapes. Remember these three key points. First, start with a circle, an oval, and a few lines. Second, use light pressure and build your details slowly. Third, practice regularly with reference photos to strengthen your skills.
Start today by sketching one circle and one oval on a blank page, then add legs and a tail. Try this now with any pencil you already own, and you will be surprised by how quickly your dog takes shape. Which breed would you like to draw first?