
 By Richard
Introduction
Did you know that 90% of children naturally love to draw before they even start school, yet most adults believe they “can’t draw”? The truth is, drawing isn’t a magical talent reserved for the gifted few—it’s a learnable skill that anyone can master with the right guidance and practice. If you’ve ever picked up a pencil, stared at a blank page, and felt stuck, you’re in exactly the right place.
Welcome to DoodleUnlimited.com, where we believe everyone is an artist waiting to unfold their creative potential. In this complete guide to drawing tutorials, you’ll discover everything you need to start your artistic journey—from understanding what drawing tutorials are and why they matter, to following step-by-step instructions that transform simple shapes into recognizable, confidence-boosting artwork.
Here’s exactly what you’ll learn in this guide:
-
What drawing tutorials are and how they accelerate your learning
-
The fascinating history behind drawing education and why it’s more important than ever
-
The 5 basics of drawing every beginner must know
-
Step-by-step drawing tutorials you can follow today (even if you’ve never drawn before)
-
Common myths holding beginners back—and the facts that will set you free
-
Expert tips, best practices, and answers to your most pressing questions
Whether you’re a parent searching for drawing tutorials for kids, an adult beginner looking for easy drawing tutorials, or someone who wants to finally understand how to draw step by step, this guide is your roadmap. Let’s pick up that pencil and start creating.
Table of Contents
-
What Are Drawing Tutorials?
-
History and Background of Drawing Education
-
Key Features and Types of Drawing Tutorials
-
Why Drawing Tutorials Matter: Benefits for Beginners and Kids
-
How to Follow Drawing Tutorials Step by Step
-
Common Myths vs Facts About Drawing
-
Expert Tips and Best Practices for Drawing Success
-
Frequently Asked Questions About Drawing Tutorials
-
Final Verdict: Your Drawing Journey Starts Here
What Are Drawing Tutorials?
Drawing tutorials are structured, step-by-step learning resources designed to teach you how to create artwork by breaking down complex subjects into simple, manageable stages. Think of them as a friendly art teacher sitting beside you, guiding your hand through each stroke, explaining what to look for, and showing you exactly how to transform basic shapes into finished drawings.
At their core, drawing tutorials for beginners follow a proven formula: they start with fundamental shapes (circles, ovals, rectangles, triangles), show you how to connect these shapes into outlines, add defining details, and finish with confident line work and optional coloring or shading. This method works because everything you draw—whether it’s a cute cartoon animal, a realistic portrait, or a complex landscape—begins as two or three simple geometric forms.
What Makes a Good Drawing Tutorial?
Not all tutorials are created equal. The best easy drawing tutorials share these characteristics:
-
Clear visual progression: Each step builds logically on the previous one, with before-and-after images showing exactly what should happen at each stage.
-
Beginner-friendly language: Instructions avoid jargon and explain concepts in plain terms anyone can understand.
-
Appropriate difficulty level: Good tutorials match their target audience—drawing tutorials for kids use simpler shapes and fewer steps than advanced lessons.
-
Practice opportunities: The best tutorials include exercises or assignments so you can apply what you’ve learned immediately.
Drawing Tutorials vs. Freeform Practice
You might wonder: why follow a tutorial instead of just drawing whatever comes to mind? Both approaches have value, but they serve different purposes. Freeform drawing (sometimes called “doodling”) is excellent for creative expression and building comfort with your materials. However, structured drawing tutorials accelerate skill development by teaching you specific techniques, proportions, and problem-solving strategies you might not discover on your own.
Think of it like learning to play guitar. Strumming randomly helps you get comfortable holding the instrument, but following chord tutorials teaches you actual songs and music theory. Similarly, drawing tutorials step by step give you the foundational skills that make freeform creativity more satisfying and successful.
Who Are Drawing Tutorials For?
Drawing tutorials serve a surprisingly wide audience:
-
Young children (ages 3–8): Simple, shape-based tutorials help kids build confidence and fine motor skills while having fun.
-
Older children and tweens (ages 9–12): More detailed tutorials introduce proportion, perspective, and character design.
-
Teen and adult beginners: Structured lessons cover fundamentals like shading, perspective, and anatomy that self-taught artists often miss.
-
Parents and educators: Tutorial collections provide ready-made activities for homeschooling, classroom art time, or rainy-day entertainment.
The beauty of drawing tutorials for beginners is that they’re designed to meet you exactly where you are. Whether you’re six or sixty, picking up a pencil for the first time or returning after years away, there’s a tutorial that fits your skill level and interests.
History and Background of Drawing Education
Drawing has been part of human expression for over 40,000 years, with the earliest known cave paintings discovered in Indonesia and Spain dating back to the Upper Paleolithic era. But drawing as a formal educational practice—what we now recognize as drawing tutorials and structured lessons—has a much shorter, yet fascinating, history.
Ancient Origins: Drawing as Communication
Before written language existed, drawing was humanity’s primary method of recording information, telling stories, and communicating across generations. Ancient Egyptians used detailed drawings in hieroglyphics to document daily life, religious beliefs, and historical events. Greek and Roman artists developed systematic approaches to depicting the human figure, establishing principles of proportion that artists still study today.
However, these early drawing practices were typically passed down through apprenticeship models, where young artists learned by copying masters in workshops—not through the step-by-step tutorials we know today.
The Renaissance: Drawing Becomes Foundation of Art
The Renaissance period (14th–17th centuries) marked a turning point in drawing education. Artists like Leonardo da Vinci, Michelangelo, and Raphael elevated drawing from craft to intellectual discipline, establishing it as the foundation of all visual arts. Leonardo’s famous notebooks—filled with anatomical studies, engineering sketches, and observational drawings—demonstrated that drawing was not just about making pretty pictures, but about understanding the world through careful observation.
During this era, art academies began forming in Italy, and drawing instruction became more systematic. Students learned through a progression: first copying prints and drawings by masters, then drawing from sculptures, and finally drawing from live models. This method, called “drawing from the antique,” remained standard in European art education for centuries.
The 19th Century: Drawing Enters Public Schools
The real birth of modern drawing tutorials for beginners came in the 1800s, when drawing education entered public school curricula for the first time. Swiss educator Johann Heinrich Pestalozzi pioneered the idea that drawing should be taught to all children, not just aspiring artists. He developed systematic exercises starting with basic lines and shapes—essentially creating the first true step-by-step drawing tutorials designed for mass education.
Pestalozzi’s approach spread across Europe and North America. By the mid-19th century, “common school drawing” programs taught children to draw geometric forms, simple objects, and eventually more complex subjects through carefully sequenced lessons. These early textbooks included numbered steps and illustrated examples—the direct ancestors of today’s online drawing tutorials for kids.
The 20th Century: From Rigor to Creativity
Drawing education underwent significant changes throughout the 20th century. In the early 1900s, schools emphasized technical precision and realistic representation. Students learned perspective, shading, and anatomical proportion through structured exercises.
However, the mid-century brought a shift toward creative expression over technical skill. Influenced by progressive education movements, many schools reduced formal drawing instruction in favor of freeform art activities. The result? Generations of students who enjoyed art class but never learned fundamental drawing skills—contributing to the widespread belief that “I can’t draw.”
The Digital Age: Drawing Tutorials Go Global
The internet revolutionized access to drawing tutorials in ways Pestalozzi could never have imagined. Platforms like YouTube, dedicated art websites, and social media channels now offer thousands of free drawing tutorials to anyone with an internet connection.
Modern drawing tutorials for beginners combine the best of historical methods—systematic progression, clear instruction, and practice exercises—with the accessibility and variety of digital media. You can now learn to draw anything from cartoon characters to realistic portraits, following along with video tutorials that pause, rewind, and replay at your own pace.
This democratization of art education means that drawing tutorials are no longer limited to art school students or wealthy families who could afford private lessons. Anyone, anywhere, at any age, can access high-quality instruction and start building real drawing skills today.
Key Features and Types of Drawing Tutorials
Not all drawing tutorials are created equal. Understanding the different types and features helps you choose the right tutorials for your goals, skill level, and learning style. Let’s explore the main categories and what makes each one unique.
By Skill Level
Drawing Tutorials for Absolute Beginners
Beginner drawing tutorials assume no prior knowledge and start from zero. They focus on:
-
Basic shape construction: Learning to see everything as combinations of circles, ovals, rectangles, and triangles.
-
Line control exercises: Practicing straight lines, curves, and consistent pressure to build hand-eye coordination.
-
Simple subjects: Tutorials for drawing basic objects, cartoon animals, or easy characters with minimal steps.
These tutorials often include warm-up exercises like drawing rows of circles or practicing different line types before moving to actual subjects.
Drawing Tutorials for Kids
Drawing tutorials for kids (typically ages 3–12) have special features:
-
Fewer steps: Lessons break down into 4–8 simple stages instead of 15–20 complex ones.
-
Large, clear visuals: Each step shows big, easy-to-see shapes with minimal detail.
-
Fun, relatable subjects: Cartoons, animals, vehicles, and characters kids recognize and want to draw.
-
Encouragement-focused language: Instructions emphasize “you can do this” over technical perfection.
Research shows that drawing for children supports cognitive development, fine motor skills, and creative thinking—making these tutorials valuable beyond just art skills.
Intermediate and Advanced Tutorials
As you progress, drawing tutorials introduce more complex concepts:
-
Proportion and anatomy: Learning realistic human or animal proportions.
-
Perspective: One-point, two-point, and three-point perspective for depth.
-
Shading and value: Creating three-dimensional form through light and shadow.
-
Texture and detail: Rendering fur, fabric, metal, and other surfaces realistically.
By Subject Matter
Character and Cartoon Drawing Tutorials
These are among the most popular easy drawing tutorials, especially for kids and beginners. They teach you to draw:
-
Cartoon animals: Bears, cats, dogs, birds, and other creatures using simple shapes.
-
Human characters: Stylized people with exaggerated features (big eyes, simplified proportions).
-
Anime and manga: Japanese-style characters with distinctive large eyes and expressive features.
Character tutorials often start with a circle for the head, add guidelines for facial features, then build the body from simple shapes.
Object and Still Life Drawing Tutorials
These lessons focus on drawing everyday items:
-
Household objects: Mugs, bottles, keys, furniture.
-
Nature elements: Leaves, flowers, trees, rocks.
-
Food and treats: Cupcakes, fruits, ice cream cones.
Object tutorials teach you to observe real-world shapes, proportions, and details—building skills that transfer to more complex subjects.
Landscape and Environment Drawing Tutorials
For those interested in drawing scenes and settings:
-
Basic landscapes: Hills, mountains, rivers, and skies.
-
Buildings and architecture: Houses, castles, cityscapes.
-
Perspective environments: Rooms, streets, and interiors with depth.
These tutorials emphasize spatial relationships, vanishing points, and atmospheric perspective.
By Format
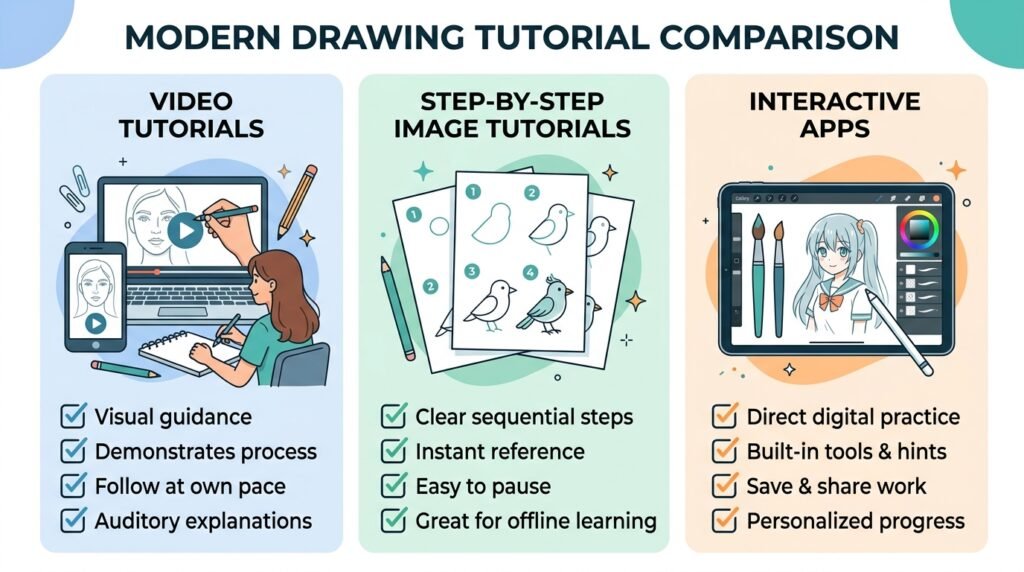
Video Drawing Tutorials
Video tutorials (like those on YouTube) offer several advantages:
-
Real-time demonstration: Watch the artist’s hand move, seeing exactly how strokes are made.
-
Pacing control: Pause, rewind, and replay difficult sections.
-
Personality and motivation: Many instructors provide encouragement and tips throughout.
Popular channels offer free drawing courses with multiple lessons building on each other.
Step-by-Step Image Tutorials
Traditional image-based tutorials show numbered steps with before-and-after illustrations:
-
Printable: Many sites offer downloadable PDFs you can print and keep.
-
Self-paced: Study each step as long as you need before moving on.
-
Visual clarity: Clean, simplified drawings remove distractions.
Sites like EasyDrawingGuides.com and ArtProjectsForKids.org specialize in this format.
Interactive and App-Based Tutorials
Newer platforms offer interactive drawing tutorials:
-
Guided drawing apps: Digital tools that provide templates and feedback.
-
Online courses: Structured programs with assignments and community support.
-
Live classes: Real-time instruction with Q&A opportunities.
Key Features to Look For
Regardless of type, the best drawing tutorials for beginners include these elements:
Why Drawing Tutorials Matter: Benefits for Beginners and Kids
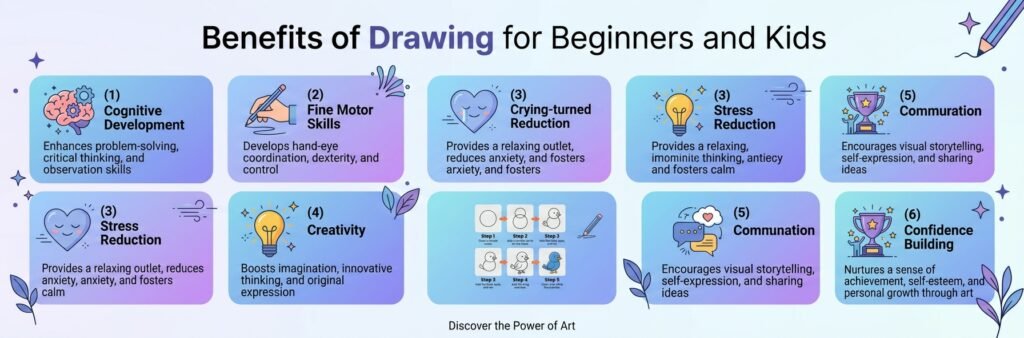
You might think drawing tutorials are just about learning to make pretty pictures. But research and expert opinion reveal far deeper benefits—especially for children and adult beginners. Understanding these advantages can motivate you to stick with practice even when progress feels slow.
Cognitive and Brain Development Benefits
Drawing isn’t just a right-brain activity. Studies show that drawing strengthens connections between both hemispheres of the brain, integrating creative and analytical thinking. When you draw, you’re simultaneously:
-
Observing carefully: Noticing details, proportions, and relationships.
-
Problem-solving: Figuring out how to translate 3D objects onto 2D paper.
-
Planning and executing: Deciding where to start, what order to draw elements, and how to correct mistakes.
For children, these cognitive benefits are even more pronounced. Research indicates that drawing as a teaching activity increases understanding in other subjects, including science and math. When kids draw what they’re learning—whether it’s a plant’s life cycle or a story’s characters—they create stronger memory connections and deeper comprehension.
Fine Motor Skills and Hand-Eye Coordination
From the moment a toddler picks up a crayon, drawing develops fine motor skills and hand-eye coordination. Gripping drawing tools, controlling line direction, and coordinating what the eye sees with what the hand does—all these actions strengthen the small muscles in fingers, hands, and wrists.
This motor development has practical implications beyond art:
-
Pre-writing skills: Drawing is a critical precursor to writing. The same muscles and coordination needed to draw shapes and lines are essential for forming letters.
-
Improved handwriting: Children who draw regularly often develop better pencil control and more legible handwriting.
-
Lifelong dexterity: Fine motor skills support countless daily activities, from typing to cooking to playing instruments.
Emotional and Psychological Benefits
Drawing offers significant mental health and emotional benefits for all ages:
Stress Reduction
Multiple studies have shown that engaging in artistic activities like drawing lowers cortisol levels, the body’s primary stress hormone. The focused attention required for drawing creates a meditative state, quieting anxious thoughts and providing a mental break from daily pressures.
Self-Expression and Identity
For children who lack vocabulary to express complex emotions, drawing provides an alternative communication channel. A child might draw a stormy scene to express anger, or a bright, sunny picture to show happiness. This non-verbal expression helps process feelings and build emotional intelligence.
For adults, drawing offers similar benefits. Many people find that regular drawing practice improves mood, reduces anxiety, and provides a sense of accomplishment—especially when following tutorials that guarantee visible progress.
Confidence and Resilience
Following drawing tutorials step by step builds confidence in several ways:
-
Visible progress: Each completed tutorial is tangible proof that you can create something recognizable.
-
Mistake correction: Learning to fix smudges, wrong lines, or proportion errors teaches resilience.
-
Skill accumulation: Over time, you notice improvement, reinforcing the growth mindset that “I can get better with practice.”
Creativity and Imagination
While tutorials provide structure, they also spark creativity by giving you tools to bring ideas to life. Once you learn basic techniques through tutorials, you can combine them in endless ways:
-
Original characters: Mix features from different tutorials to create unique creatures or people.
-
Storytelling: Draw scenes from your imagination or illustrate stories you’ve written.
-
Problem-solving: Apply tutorial techniques to draw subjects you’ve never seen taught before.
Creativity, like any skill, improves with exercise. The more you draw—whether following tutorials or freehand—the more your imagination develops.
Social and Communication Benefits
Drawing isn’t always a solitary activity. Group drawing sessions (in classrooms, art clubs, or family time) build social skills:
-
Collaboration: Working on shared murals or projects teaches teamwork.
-
Communication: Discussing drawings helps children develop vocabulary and storytelling abilities.
-
Cultural awareness: Drawing subjects from different cultures or historical periods expands worldview.
For adults, sharing artwork online or in communities creates connections with fellow artists, providing support, feedback, and inspiration.
Academic and Career Advantages
While not everyone becomes a professional artist, drawing skills transfer to many fields:
-
Design and architecture: Understanding form, proportion, and perspective is foundational.
-
Science and medicine: Medical illustrators, biologists, and engineers use drawing to document and communicate ideas.
-
Education: Teachers who can draw engage students more effectively and explain concepts visually.
-
Communication: Sketching ideas in meetings or presentations clarifies thinking and persuades audiences.
Even if you never use drawing professionally, the cognitive, motor, and emotional benefits make it a worthwhile pursuit for lifelong learning and well-being.
How to Follow Drawing Tutorials Step by Step
Ready to start drawing? This section walks you through exactly how to follow drawing tutorials—from gathering supplies to completing your first project. Whether you’re working through drawing tutorials for kids or beginner tutorials for adults, these steps apply universally.
Step 1: Gather Your Materials
You don’t need expensive equipment to start. Here’s the basic setup:
Essential supplies:
-
Paper: Standard printer paper works fine for practice. Sketchbooks are nice but optional.
-
Pencils: A regular HB or #2 pencil is perfect. If you want variety, get an HB (medium), 2B (softer/darker), and 4B (very soft/dark).
-
Eraser: A white vinyl or kneaded eraser removes mistakes cleanly.
-
Sharpener: Keep your pencil point sharp for clean lines.
Optional additions:
-
Colored pencils, markers, or crayons for finishing touches
-
Ruler for straight lines (though freehand is better practice)
-
Blending stump or tissue for shading
Pro tip: Don’t let lack of “perfect” supplies stop you. Some of the best artists started with whatever pencil and paper they could find.
Step 2: Choose the Right Tutorial
Not all tutorials suit all learners. Consider these factors:
For young children (ages 3–8):
-
Look for drawing tutorials for kids with 4–8 simple steps.
-
Choose subjects they love: animals, cartoon characters, vehicles, or food.
-
Video tutorials with cheerful narrators often hold attention better.
To older children and tweens (ages 9–12):
-
Select tutorials with slightly more detail and steps (8–15).
-
Introduce variety: animals one day, characters the next, objects another.
-
Encourage trying both video and image-based tutorials to find preference.
For teen and adult beginners:
-
Start with basic drawing tutorials covering fundamental shapes and line control.
-
Choose subjects matching your interests (characters, nature, architecture).
-
Consider structured courses that build skills progressively.
[ Best Drawing Tutorials for Absolute Beginners on DoodleUnlimited]
Step 3: Set Up Your Workspace
Create an environment that supports focus:
-
Good lighting: Natural light is ideal, but a bright desk lamp works.
-
Flat surface: A table or desk at comfortable height prevents strain.
-
Minimal distractions: Turn off notifications, close unnecessary tabs, and let others know you need uninterrupted time.
-
Reference visible: If following a video, position your screen so you can see both the tutorial and your paper without constant head-turning.
Step 4: Warm Up Your Hand
Before diving into the tutorial, spend 2–3 minutes warming up:
-
Draw straight lines: Horizontal, vertical, and diagonal across the page.
-
Practice circles: Draw rows of circles, trying to make them round and consistent.
-
Loosen your grip: Shake out your hand and roll your shoulders—tension creates stiff lines.
These exercises, borrowed from formal art training, improve line quality and reduce frustration.
Step 5: Follow the Tutorial Step by Step
Now for the main event. Here’s how to approach each stage:
Read or watch the entire tutorial first (if it’s short). Understanding the overall flow helps you anticipate what’s coming.
Work one step at a time:
-
Study the step: Look carefully at what the tutorial shows. What shapes are being added? Where do they connect?
-
Lightly sketch: Use gentle pressure so mistakes erase easily. These are construction lines, not final artwork.
-
Compare frequently: Check your drawing against the tutorial after each step. Catching errors early prevents compounding mistakes.
-
Ask questions: If a step confuses you, pause and analyze. What’s the purpose of this line? What shape is it creating?
Don’t rush. Quality matters more than speed. A 15-minute tutorial might take you 45 minutes the first time—and that’s perfectly normal.
Step 6: Refine and Finalize
Once you’ve completed all steps:
-
Review your drawing: Identify lines you’re happy with and areas needing adjustment.
-
Darken final lines: Go over the lines you want to keep with confident, slightly darker strokes.
-
Erase construction lines: Remove any guidelines or extra marks that aren’t part of the final image.
-
Add color or shading (optional): If the tutorial includes this step, follow along. Otherwise, leave it black and white or color creatively.
Step 7: Practice and Repeat
One tutorial won’t make you an expert. Consistent practice is the real secret:
-
Daily drawing: Even 10–15 minutes daily beats one long session per week.
-
Repeat tutorials: Redoing the same tutorial 2–3 times shows improvement and builds muscle memory.
-
Try variations: Once you’ve mastered a tutorial, modify it—change the pose, add accessories, or combine elements from different lessons.
[30-Day Drawing Challenge for Beginners on DoodleUnlimited]
Sample Tutorial Walkthrough: Drawing a Simple Bird
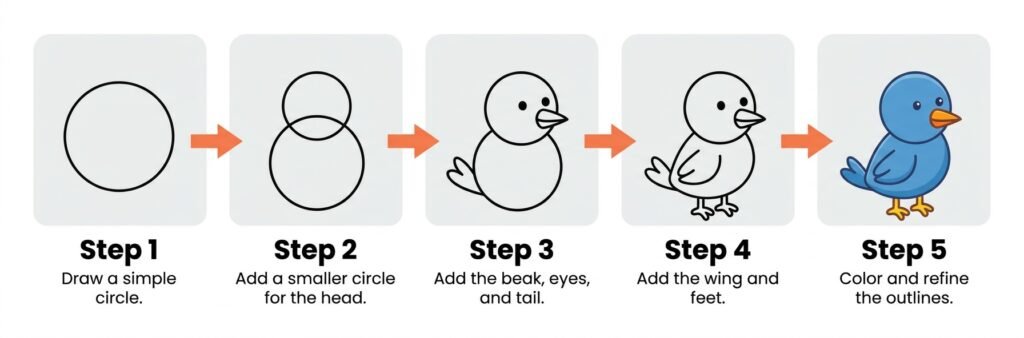
Let’s apply these steps to a concrete example. Here’s how you’d follow a basic bird tutorial:
No 1: Draw a circle for the bird’s body.
Step 2: Add a smaller circle overlapping the first for the head.
No 3: Draw a small triangle for the beak, attached to the head circle.
Step 4: Add two dots for eyes inside the head circle.
Step 5: Sketch a curved line from the body for the wing.
No 6: Draw two small lines at the bottom for feet.
Step 7: Darken final lines, erase extras, and add color if desired.
This simple process—basic shapes → connect → add details → refine—is the foundation of virtually every drawing tutorial for beginners.
Step 8: Track Your Progress
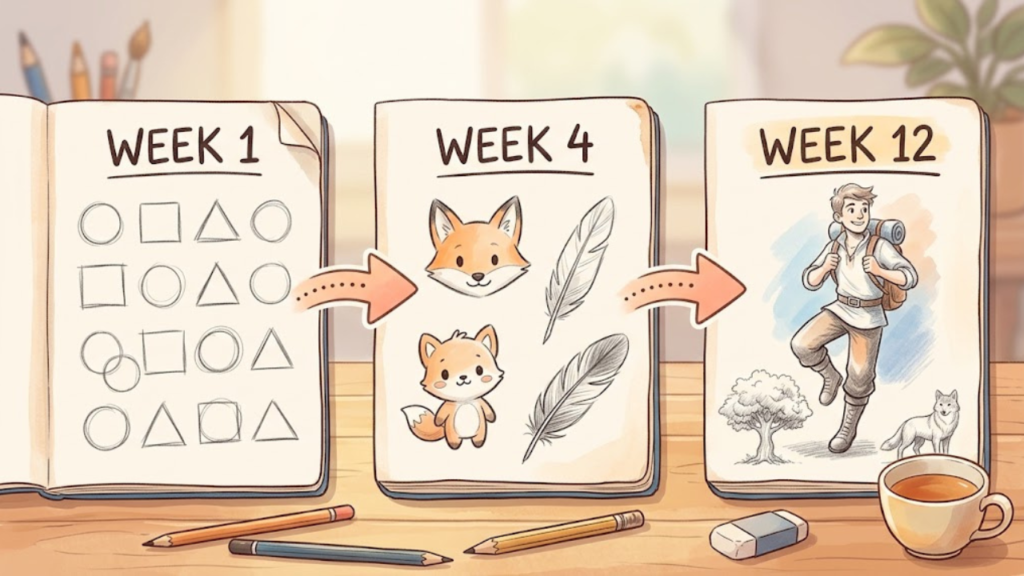
Keep all your drawings, even the “bad” ones. After a few weeks, compare new work to early attempts. You’ll likely notice:
-
Cleaner lines: More confident, less scratchy strokes.
-
Better proportions: Shapes look more like the intended subject.
-
Faster completion: Tutorials take less time as your hand learns the movements.
This visible progress is powerful motivation to keep going.
Common Myths vs Facts About Drawing
Misconceptions about drawing prevent countless people from ever trying—or cause them to quit too soon. Let’s debunk the most common myths with evidence-based facts.
Myth 1: “You Need Natural Talent to Draw Well”
Fact: Drawing is a learnable skill, not an innate gift.
Research in skill acquisition shows that deliberate practice—focused, structured effort with feedback—produces improvement in virtually any domain, including art. The artists you admire didn’t start out talented; they started out practicing, often badly, and improved over thousands of hours.
Studies of art education demonstrate that students who follow systematic drawing tutorials and practice regularly show significant improvement, regardless of initial “talent.” The difference between a “talented” artist and a beginner is usually just time spent practicing.
Myth 2: “Drawing Tutorials Make You Dependent—You Should Just Draw Freehand”
Fact: Tutorials build the foundation that makes freehand drawing possible.
Think of tutorials like training wheels. They provide structure while you develop muscle memory, hand-eye coordination, and visual understanding. Once these fundamentals are internalized, you naturally draw more confidently without step-by-step guidance.
Professional artists still use references and tutorials when learning new subjects. The difference is they know how to learn—and tutorials accelerate that process.
Myth 3: “Kids Should Just Draw Creatively Without Instruction”
Fact: Children benefit from both freeform drawing AND structured tutorials.
Unstructured drawing fosters creativity and self-expression—both valuable. However, drawing tutorials for kids teach specific skills (proportion, shape recognition, observation) that enhance creative work.
Research shows that children who receive drawing instruction alongside free creative time produce more detailed, confident artwork than those with only unstructured drawing time. The two approaches complement each other.
Myth 4: “If You Can’t Draw Realistically, You’re Bad at Drawing”
Fact: Realism is just one style among many—and not necessarily the “best.”
Art encompasses countless styles: cartoon, abstract, impressionist, minimalist, and more. Each has value and requires different skills. A “simple” cartoon drawing that effectively communicates emotion or humor is successful art, even if it’s not photorealistic.
Drawing tutorials exist for every style. Choose the aesthetic that resonates with you rather than chasing an arbitrary standard of “realism.”
Myth 5: “Adults Can’t Learn to Draw—It’s Too Late”
Fact: Adults can absolutely learn to draw, often faster than children.
While children have advantages (more free time, less self-criticism), adults bring discipline, patience, and analytical thinking to learning. Adult beginners who follow structured drawing tutorials and practice consistently can achieve impressive results within months.
The key is managing expectations. You won’t become a master in a week, but measurable progress is absolutely achievable with regular practice.
Expert Tips and Best Practices for Drawing Success
After analyzing hundreds of drawing tutorials and consulting art education research, here are the most effective strategies for rapid improvement.
Tip 1: Master the 5 Basics of Drawing
According to art educators, these five fundamentals underpin all drawing skills:
-
Line control: Drawing straight, curved, and varied-pressure lines confidently.
-
Shape recognition: Seeing complex subjects as combinations of simple forms (circles, rectangles, triangles).
-
Proportion: Understanding relative sizes—how big is the head compared to the body? How long are the legs?
-
Perspective: Depicting depth and three-dimensionality on flat paper.
-
Value (light and shadow): Using shading to create form and dimension.
Focus your early practice on these fundamentals through targeted exercises.
Tip 2: Practice the 50% Rule
Popularized by artist and educator Mark Kistler, the 50% rule states:
Spend 50% of your drawing time on structured practice (tutorials, exercises) and 50% on free, playful drawing without judgment.
This balance prevents burnout (from only doing rigid practice) and ensures skill development (from only doodling aimlessly).
Tip 3: Draw What You See, Not What You Think You See
Beginners often draw from memory or assumptions (“eyes are almond-shaped,” “trees are green lollipops”). Instead, observe carefully:
-
What’s the actual shape of this object?
-
Where do edges meet?
-
How do proportions compare?
This observational approach—called drawing from life—dramatically improves accuracy.
Tip 4: Use the “Upside-Down Drawing” Trick
Struggling with a subject? Try this:
-
Find a reference photo.
-
Turn it upside down.
-
Draw it upside down.
This technique, used in art classes worldwide, bypasses your brain’s symbolic shortcuts (drawing what you “know” instead of what you see). You’ll likely produce more accurate proportions.
Tip 5: Embrace Mistakes as Learning Opportunities
Every “bad” drawing teaches you something:
-
Too dark? Practice lighter pressure.
-
Proportions off? Study measurement techniques.
-
Lines shaky? Do more warm-up exercises.
Artists don’t avoid mistakes—they analyze and adjust. Keep a “mistake journal” noting what went wrong and how to fix it next time.
Tip 6: Set Specific, Achievable Goals
Vague goals (“get better at drawing”) don’t motivate. Specific ones do:
-
“Complete 3 drawing tutorials this week.”
-
“Practice drawing circles for 10 minutes daily.”
-
“Finish one full character drawing by Sunday.”
Track your goals and celebrate when you hit them.
Tip 7: Join a Community
Drawing alone can feel isolating. Connect with others:
-
Online communities: Reddit’s r/learnart, Discord art servers, Instagram art accounts.
-
Local groups: Community center classes, library workshops, school art clubs.
-
Social accountability: Share progress with friends or family who encourage you.
Seeing others’ journeys normalizes your own struggles and provides inspiration.
Tip 8: Study Master Artists
Once you’re comfortable with basics, analyze work by artists you admire:
-
How do they construct forms?
-
What line quality do they use?
-
How do they handle light and shadow?
Try copying their work (for practice, not publication) to internalize their techniques.
Tip 9: Invest in Quality References
Not all tutorials are equal. Look for:
-
Clear, high-resolution images or videos.
-
Logical step progression with no skipped stages.
-
Positive reviews from other beginners.
Sites like DoodleUnlimited, EasyDrawingGuides, and ArtProjectsForKids curate quality tutorials.
[ Artists Network – Free Drawing for Beginners Guide]
Tip 10: Be Patient and Consistent
Improvement isn’t linear. Some days you’ll feel stuck; other days, breakthroughs happen. The key is showing up consistently. Even 15 minutes daily produces better results than sporadic 3-hour sessions.
Remember: every artist you admire started exactly where you are now—with a pencil, paper, and willingness to try.
Frequently Asked Questions About Drawing Tutorials
Q1: How do I teach myself drawing?
Answer: Teaching yourself drawing is absolutely achievable with the right approach. Start by following structured drawing tutorials for beginners that cover fundamental skills: line control, basic shapes, proportion, and simple subjects.
Create a practice routine: dedicate 15–30 minutes daily to drawing. Alternate between following tutorials (50% of time) and freeform drawing (50%) to build both skills and creativity.
Use free online resources: YouTube channels, art websites, and printable tutorials offer thousands of lessons at no cost. Track your progress by dating each drawing—seeing improvement over weeks and months provides powerful motivation.
Consider joining online communities (Reddit’s r/learnart, Discord servers) for feedback and support. Finally, be patient: self-taught artists often progress slower than those with formal instruction, but consistent practice guarantees improvement.
Q2: What is the 50% rule in art?
Answer: The 50% rule is a practice guideline popularized by artist Mark Kistler. It suggests spending half your drawing time on structured practice (tutorials, exercises, skill-building drills) and half on playful, judgment-free drawing (doodling, experimenting, creating for fun).
This balance prevents two common pitfalls:
-
Burnout from only practicing: Endless exercises without creative expression become tedious.
-
Stagnation from only doodling: Drawing the same things repeatedly without learning new techniques limits growth.
The 50% rule ensures you’re both building skills and enjoying the process. Adjust the ratio based on your goals—preparing for a project might mean 70% practice, while a creative slump might call for 70% play. The key is maintaining both elements over time.
Q3: What can my 11-year-old draw?
Answer: Eleven-year-olds can draw a wide variety of subjects, depending on interest and skill level. Great options include:
Animals: Cats, dogs, birds, horses, and fantasy creatures like dragons. Many tutorials break animals into simple shapes, making them accessible.
Characters: Cartoon people, anime-style figures, or original characters. At this age, kids often enjoy drawing their favorite video game or movie characters.
Objects and scenes: Vehicles (cars, planes, boats), food (cupcakes, pizza), nature (trees, flowers, landscapes), and everyday items (phones, shoes, furniture).
Abstract and creative drawings: Mandalas, patterns, comic strips, or illustrations for stories they’ve written.
Encourage variety: mixing structured tutorials with freeform creativity keeps drawing engaging. At 11, children can handle more detailed tutorials (10–15 steps) and are developing the patience for longer projects.
Most importantly, let them draw what excites them—passion fuels practice, and practice builds skill.
Q4: What are the 5 basics of drawing?
Answer: Art educators consistently identify these five fundamentals as the core basics of drawing:
-
Line Control: The ability to draw straight, curved, and varied-pressure lines with confidence. This includes practicing different line weights (light to dark) and types (continuous, broken, hatching).
-
Shape Recognition: Seeing complex subjects as combinations of simple geometric forms—circles, ovals, rectangles, triangles, and cylinders. Everything from faces to cars starts as basic shapes.
-
Proportion: Understanding and depicting relative sizes correctly. How large is the head compared to the body? How long are the arms? Accurate proportion makes drawings look realistic and intentional.
-
Perspective: The technique of representing three-dimensional space on two-dimensional paper. This includes one-point, two-point, and three-point perspective for creating depth and dimension.
-
Value (Light and Shadow): Using shading to show form, depth, and lighting. Understanding how light falls on objects creates highlights, mid-tones, and shadows that make drawings appear three-dimensional.
Mastering these basics through targeted exercises and tutorials provides the foundation for all drawing styles and subjects.
Q5: How long does it take to learn to draw?
Answer: The timeline varies based on goals, practice frequency, and definition of “learn to draw.” Here’s a realistic breakdown:
Basic competency (drawing recognizable subjects): With 15–30 minutes of daily practice following tutorials, most beginners can draw simple, recognizable subjects within 2–4 weeks.
Intermediate skills (good proportions, basic shading, variety of subjects): Achievable within 3–6 months of consistent practice (30–60 minutes daily).
Advanced proficiency (realistic drawings, complex compositions): Typically requires 1–3 years of dedicated practice, often including formal study or advanced tutorials.
Professional level: Many working artists have 5+ years of practice and training.
Key factors affecting timeline:
-
Practice consistency: Daily practice beats sporadic long sessions.
-
Quality of instruction: Good tutorials accelerate learning.
-
Feedback: Getting critique from experienced artists helps correct mistakes faster.
-
Goals: Learning cartoon drawing is faster than photorealism.
Remember: “learning to draw” isn’t a destination—it’s a journey. Even professional artists continue learning throughout their careers. Focus on progress, not perfection, and enjoy each stage of development.
Final Verdict: Your Drawing Journey Starts Here
Drawing tutorials are more than just step-by-step instructions—they’re your gateway to a skill that enriches your life in countless ways. From cognitive development and stress reduction to creative expression and confidence building, the benefits of learning to draw extend far beyond the page.
Whether you’re a parent seeking drawing tutorials for kids, an adult beginner picking up a pencil for the first time, or someone returning to art after years away, the path forward is clear:
-
Start simple: Choose beginner-friendly tutorials focusing on basic shapes and easy subjects.
-
Practice consistently: Even 15 minutes daily produces measurable improvement over weeks and months.
-
Embrace the process: Mistakes aren’t failures—they’re data points guiding your next attempt.
-
Stay curious: Explore different subjects, styles, and tutorial formats to find what resonates.
The myth that drawing requires “natural talent” has prevented too many people from ever trying. The truth? Anyone can learn to draw with the right guidance, patience, and practice.
At DoodleUnlimited, we’re committed to providing the highest-quality drawing tutorials step by step for beginners and kids. Our library covers everything from simple cartoon animals to detailed character designs—all designed to build your skills progressively and boost your confidence.
[Browse Our Complete Collection of Free Drawing Tutorials]
Your artistic journey starts with a single line. Pick up your pencil, choose a tutorial, and start creating. The world needs your unique perspective—and your drawings are waiting to be made.
Call to Action
Ready to start drawing?
-
Comment below: What’s the first thing you want to learn to draw? Share your goals and let’s support each other!
-
Share this guide: Know someone who says “I can’t draw”? Send them this post and prove them wrong.
-
Explore related posts:
Remember: every artist started exactly where you are now. The only difference between you and the artists you admire is practice. Start today, stay consistent, and watch your skills grow.
Happy drawing!