Introduction
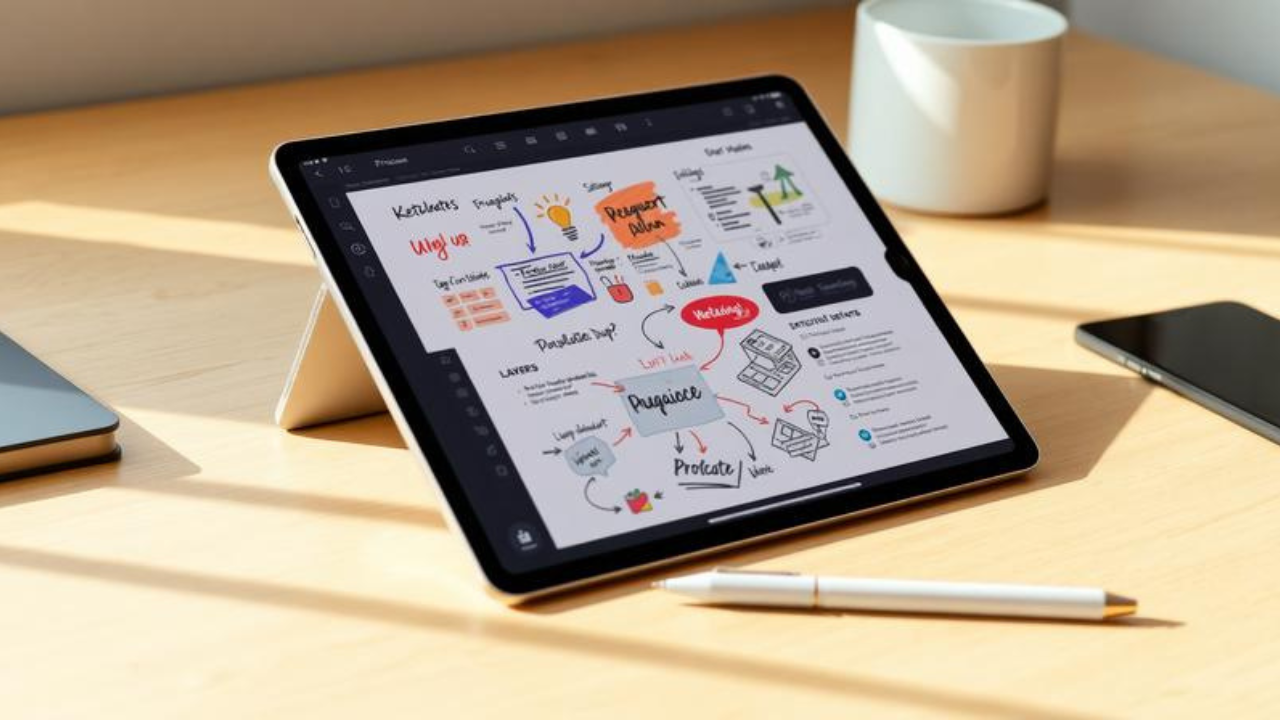
Let me paint you a picture. It’s 2:17 PM in a crowded conference hall. Two hundred people are frantically typing notes on their laptops, their screens glowing like a sea of identical rectangles. But three rows back, one attendee sits calmly with an iPad and an Apple Pencil, her screen displaying something entirely different: a colorful, sprawling visual map of the speaker’s ideas, complete with hand-drawn icons, connecting arrows, playful banners, and bold headings that seem to leap off the digital canvas.
She’s not just taking notes. She’s thinking out loud—visually. And she’s about to remember more of this talk than almost anyone else in the room.
Here’s the problem most students and professionals face: traditional note-taking is broken. We write down words, forget them, and move on. But what if your notes could actually work for you—engaging your brain, boosting your memory, and even making the process enjoyable?
Enter sketchnoting with Procreate. This tutorial will show you exactly how to transform your iPad into a creativity-driven learning machine, using Procreate to create visual notes that are not only beautiful but scientifically proven to enhance retention and understanding. You don’t need to be an artist. don’t need fancy equipment. You just need curiosity, an iPad, and the willingness to try something different.
By the end of this guide, you’ll have a complete toolkit for digital sketchnoting—from setting up your first canvas to mastering the techniques that will make your notes unforgettable.
Background: Why Digital Sketchnoting Matters Right Now
Sketchnoting isn’t new. Humans have been combining words and pictures to capture ideas for millennia—from cave paintings to Leonardo da Vinci’s notebooks. But the digital revolution has given this ancient practice a powerful upgrade.
The term “sketchnoting” was popularized by designer Mike Rohde in 2006, but the practice has exploded in recent years, thanks in large part to the iPad and apps like Procreate. Today, sketchnoting is used everywhere: in university lecture halls, corporate boardrooms, conference sessions, and even classrooms from elementary through graduate level.
The science behind it is compelling. Dual coding theory, developed by psychologist Allan Paivio, shows that our brains process verbal and visual information through separate channels. When you engage both simultaneously, you create two pathways to the same information—meaning two chances to remember it. Digital sketchnoting takes this a step further, offering capabilities that paper simply can’t match: unlimited undos, infinite canvas, the ability to move elements around, and a library of tools at your fingertips.
But perhaps the most exciting development is accessibility. You don’t need to be a professional illustrator to create stunning digital sketchnotes. With the right techniques—and Procreate’s intuitive interface—anyone can produce visual notes that are both functional and beautiful.
Getting Started: Your Procreate Sketchnoting Setup
The Essential Toolkit
Before we dive into techniques, let’s talk tools. Here’s what you need:
-
An iPad (any model that supports the Apple Pencil)
-
An Apple Pencil (first-generation, second-generation, or USB-C)
-
Procreate (a one-time purchase, not a subscription—worth every penny)
-
Optional but recommended: A Paperlike screen cover for that natural pen-on-paper feel
That’s it. No expensive art supplies. No messy inks. Just you, your iPad, and a world of creative possibility.
Setting Up Your Canvas
Open Procreate and tap the “+” icon to create a new canvas. For sketchnoting, a standard size like 2048×2048 pixels works well for beginners. But here’s a pro tip: consider using a canvas that matches your screen size or larger. This gives you room to spread out and think.
Choosing Your Brushes
One of the biggest mistakes beginners make is getting overwhelmed by Procreate’s massive brush library. Don’t. For sketchnoting, you really only need two or three brushes:
-
A thin brush for writing – Try the 6B Pencil in the Sketching set for a natural, hand-drawn feel, or the Technical Pen for clean, consistent lines.
-
A thicker brush for backgrounds and shading – Something like the Medium Hard Airbrush or a chunky marker.
-
Optional: A textured brush for adding visual interest.
Remember: simplicity is your friend. Two layers are often sufficient—one for your main content and one for background colors. This keeps your workflow fast and your file manageable.
The Core Techniques: How to Sketchnote Like a Pro
Technique #1: Trace Your Way to Confidence
Here’s a secret that professional sketchnoters don’t always tell you: tracing is completely legitimate. In fact, it’s one of the most powerful techniques for beginners.
Apple Distinguished Educator Pat recently shared this insight: tracing removes the roadblock “I can’t draw!” and helps students draw again “like a 4-year-old wearing a Batman cape—without fear”.
Here’s how to do it in Procreate:
-
Find an image or diagram you want to include
-
Import it into Procreate as a new layer
-
Lower the opacity of that layer
-
Create a new layer on top and trace away
The beauty of digital tracing? You can do it cleanly, adjust as you go, and the “undo” button is always there to catch your mistakes.
Technique #2: Master the Basic Shapes
Every complex drawing is just a combination of simple shapes. Sketchnotes are built on basic forms: lines, dots, circles, triangles, squares, and arrows.
Take five minutes before your next sketchnoting session to warm up. Draw circles. Draw squares. Connect them with lines. This isn’t busywork—it’s training your hand-eye coordination and building muscle memory.
From these basic shapes, you can create almost any icon you need. A heart? Two circles and a triangle. A lightbulb? A circle with a rectangle underneath. A person? A circle (head) on top of a rectangle (body) with lines for arms and legs.
Technique #3: Structure Your Canvas Intentionally
This is where digital sketchnoting truly shines. Instead of writing linearly across the page like you would on paper, think of your canvas as a blank wall where you can arrange ideas spatially.
Pick one corner of your canvas and start there. Jot down the main idea. Then move to a different section for supporting points. Use boxes, bubbles, and borders to group related concepts. Connect everything with arrows to show relationships.
The result? A visual map of ideas that your brain can navigate easily—because you’re using spatial memory alongside verbal memory.
Technique #4: Keep It Simple, Smartypants (K.I.S.S.)
The K.I.S.S. principle—Keep It Simple, Stupid—is a design maxim that applies perfectly to sketchnoting. You have limited space on your canvas, so only record what’s important.
Ask yourself: “What’s the essence of this idea?” Capture that. Everything else is noise.
This means using keywords and short phrases instead of full sentences. It means choosing one powerful icon over a cluttered paragraph. It means embracing white space as a design element, not something to be filled.
Advanced Techniques: Taking Your Sketchnotes to the Next Level
Add Depth with Shadows and Shading
Once you’re comfortable with the basics, experiment with adding shadows and depth to your sketchnotes. A simple drop shadow under a heading or a subtle gradient in a background box can make your notes pop.
In Procreate, this is easy: duplicate your text or shape layer, move it slightly, change the color to a darker shade, and lower the opacity. Instant depth.
Incorporate Figures and Emotions
Sketchnotes become more engaging when they include people. Adding simple figures with facial expressions and body language brings your notes to life.
Don’t overthink this. Stick figures work perfectly. The key is the emotion: a smile, a furrowed brow, raised hands in excitement. These visual cues help you remember not just what was said, but how it felt.
Build Your Personal Icon Library
Over time, you’ll develop a repertoire of icons that you use repeatedly. A lightbulb for ideas. A brain for thinking. A rocket for launching something new. A magnifying glass for analysis.
Procreate makes this easy. Create a dedicated canvas where you sketch and refine your favorite icons. You can even export them as PNGs with transparent backgrounds and import them into future sketchnotes.
Real-World Success: How Students and Professionals Are Using This
The proof is in the practice. At Auburn University, over 800 first-year engineering students learned sketchnoting as part of their seminar course. The results? Students reported that the technique “genuinely helped me recall information during the exam”.
Research in neuroscience supports this: when students write by hand, the brain areas involved in verbal, visual, and motor information processing sync up with areas critical to memory formation.
One sketchnoter, Jatin Kapadia, decided to tackle a month-long sketchnoting challenge using Procreate instead of his usual pen and paper. He described it as the perfect platform to learn the tool, picking up “cool tips and tricks” and having multiple “A-ha!” moments along the way.
The message is clear: Procreate isn’t just for artists. It’s for anyone who wants to think better, remember more, and actually enjoy the process of taking notes.
The Nuance: When Sketchnoting Might Not Be the Answer
Let’s be real for a moment. Sketchnoting with Procreate is powerful, but it’s not magic. And it’s not for every situation.
When it works best: Live events, conferences, lectures, and any situation where ideas are flowing and you have time to process. Sketchnoting forces you to listen actively and synthesize information in real-time.
When it might not work: Fast-paced technical presentations where every detail matters, or when you’re learning a topic from scratch. In these cases, trying to sketchnote might actually hurt your comprehension because you’re splitting your attention between listening and drawing.
The workaround? If you’re learning something new, focus on listening first. Then replay the content and sketchnote it afterward. This gives you the best of both worlds: deep understanding and beautiful notes.
Also worth noting: Procreate is an illustration app first. For pure text-based note-taking with searchable handwriting, apps like Notability or GoodNotes might be more appropriate. Procreate shines when visuals are central to your note-taking style.
Actionable Takeaways
-
Start with a warm-up. Before your next sketchnoting session, spend 5 minutes drawing basic shapes. It’s like stretching before a workout.
-
Limit your tools. Choose 2-3 brushes and stick with them. Two layers are plenty. Simplicity equals speed.
-
Trace when you need to. Import images, lower the opacity, and trace. It’s not cheating—it’s smart.
-
Structure spatially. Don’t write across the entire canvas like a word processor. Use different areas for different ideas.
-
Review and refine. The real power of sketchnoting isn’t just in creating—it’s in reviewing. Your visual notes are infinitely more engaging to revisit than walls of text.
-
Be patient. Your first few sketchnotes might feel awkward. That’s normal. Every sketchnoter starts somewhere.
Frequently Asked Questions
1. Do I need to be good at drawing to sketchnote in Procreate?
Absolutely not. Sketchnoting relies on simple shapes—dots, lines, circles, triangles, and squares. Stick figures and basic icons are perfectly effective. The goal is meaning, not artistry.
2. What’s the best brush for sketchnoting in Procreate?
Most sketchnoters recommend starting with the 6B Pencil in the Sketching set for writing, and a thicker brush like the Medium Hard Airbrush for backgrounds. Experiment and find what feels natural to you.
3. How many layers should I use?
Two layers are often sufficient—one for your main content and one for background colors. Using separate layers makes it easier to edit or erase mistakes without affecting other elements.
4. Can I trace images in Procreate for my sketchnotes?
Yes! Tracing is a legitimate technique that many professionals use. Import an image, lower its opacity, create a new layer on top, and trace away. It’s a great way to build confidence and include complex visuals.
5. Is Procreate better than other note-taking apps?
It depends on your needs. Procreate excels at visual, illustration-heavy sketchnotes. For searchable handwritten text notes, apps like Notability or GoodNotes might be better. Many sketchnoters use both depending on the context.
6. How do I structure my canvas for sketchnoting?
Think of your canvas as a blank wall. Start in one corner for the main idea, move to different sections for supporting points, and use boxes, arrows, and borders to show relationships. Don’t write linearly across the entire canvas.
7. What if I’m learning a topic from scratch—should I sketchnote it?
It may be more effective to focus fully on listening first, then replay the content and sketchnote it afterward. This ensures you grasp the material before trying to visualize it.
Conclusion
Here’s the truth: your notes are a reflection of your thinking. If your notes are messy, disorganized, and boring, chances are your thinking is too. But when your notes are visual, structured, and engaging, you’re not just recording information—you’re actively processing it.
Sketchnoting with Procreate gives you superpowers that paper notes simply can’t match. The ability to move elements around. The freedom to experiment without fear. The joy of creating something that’s not just useful, but beautiful. And the science-backed confidence that you’re actually going to remember what you learned.
You don’t need to be an artist. You don’t need expensive supplies. U just need an iPad, a willingness to try, and the understanding that every master sketchnoter started exactly where you are right now.
So open Procreate. Create that first canvas. Draw a circle, then another, then connect them with a line. Sketch a stick figure, give it a smile, and put a thought bubble above its head.
That’s not just a doodle. That’s the beginning of a smarter way to think.
Now go make some visual magic. Your brain will thank you.